« Previous -
Version 61/374
(diff) -
Next » -
Current version
Etienne Pallier, 03/30/2016 10:20 pm
Project Installation
Project Development page : Project Development
HOWTO Format Redmine Wiki : http://www.redmine.org/projects/redmine/wiki/FrRedmineWikiFormatting
- Project Installation
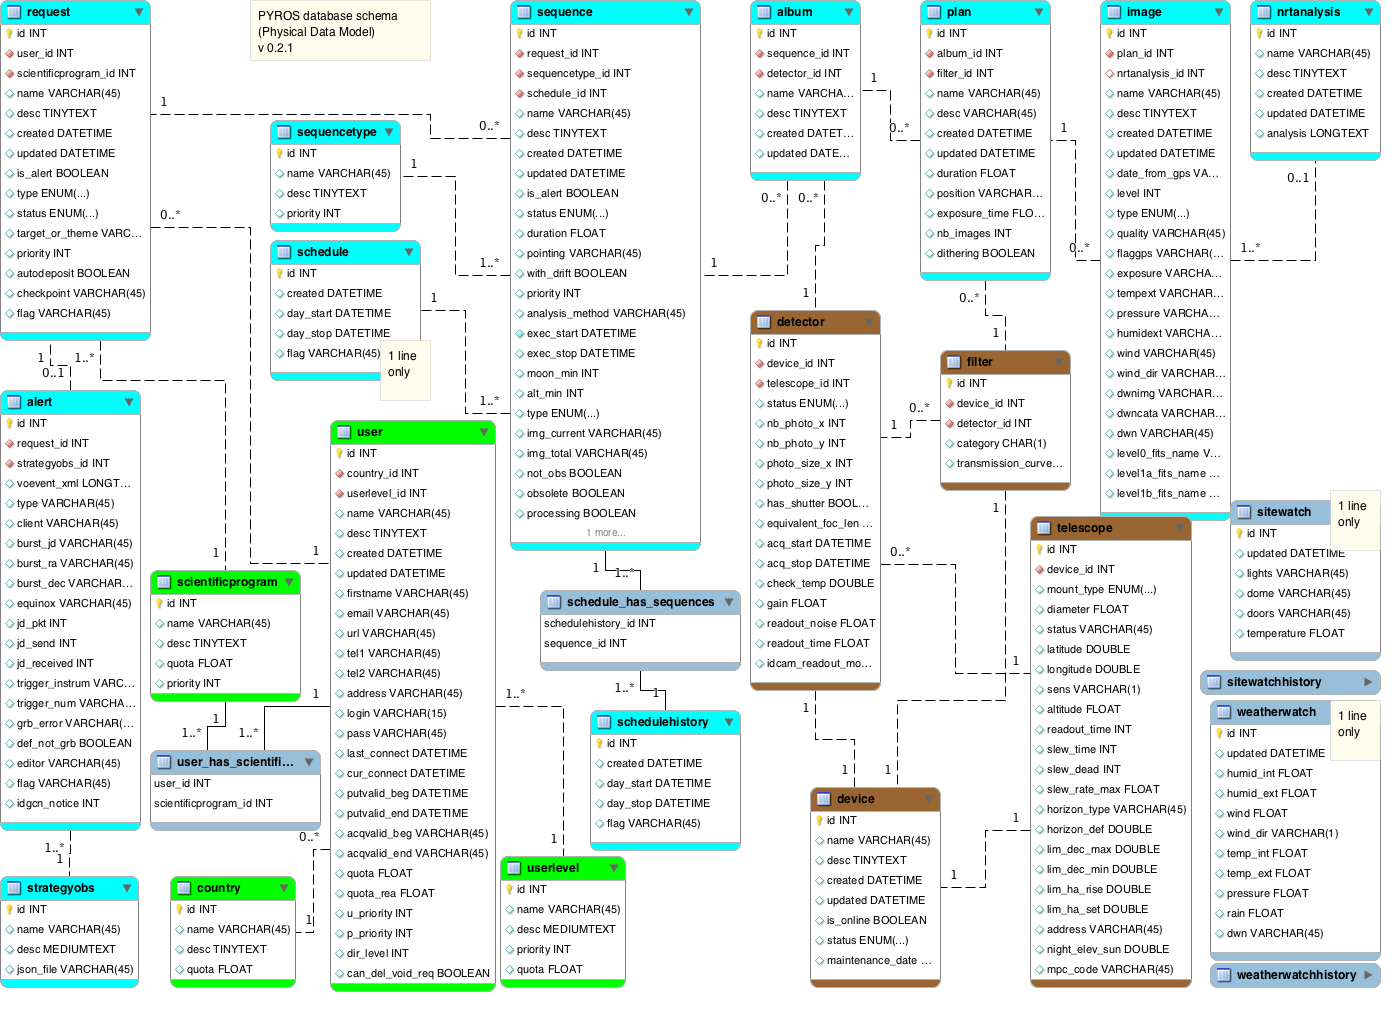
- I - DATABASE SCHEMA (v0.2.1)
- II - Get the project (from gitlab)
- III - INSTALLATION OF NEEDED DEPENDENCIES
- Install a database server (only if necessary)
- Install Python3.5 (only if necessary)
- Create a Python3 virtual environment dedicated to the project (inside the project folder)
- Activate the python virtual environment (from inside the project)
- Install the needed Python packages (from within the virtual environment)
- (Eclipse only) Set the Python3 virtual environment as the project interpreter
- Run the project
- IV - TEST
- NOTES FOR ECLIPSE USERS
I - DATABASE SCHEMA (v0.2.1)
II - Get the project (from gitlab)
Browse the code from gitlab
https://gitlab.irap.omp.eu/epallier/pyros/tree/master
Project structure
Once you have fetched the project, you should obtain this structure:
PYROS/
├── install/
│   └── REQUIREMENTS.txt
│   └── INSTALLATION.txt
├── public/
│   └── static/
├── src/
│   ├── manage.py
│   ├── pyros/
│   │   ├── __init__.py
│   │   ├── __pycache__
│   │   ├── settings.py
│   │   ├── urls.py
│   │   └── wsgi.py
│   └── pyrosapp/
│       ├── __init__.py
│       ├── admin.py
│       ├── apps.py
│       ├── migrations
│       ├── models.py
│       ├── tests.py
│       └── views.py
From Eclipse
See below, section "NOTES FOR ECLIPSE USERS"
From the terminal
git clone https://gitlab.irap.omp.eu/epallier/pyros.git PYROS
(or also : git clone git@gitlab.irap.omp.eu:epallier/pyros.git PYROS)
This creates a PYROS/ folder containing the project (with a .git/ subfolder for synchronization with the git repository)
(
If you just wanted a static copy of the project (without synchronization), just remove the .git/ folder:
$ rm -r .git/
)
Now, Pyros needs some dependencies that you have to install.
For this, you can read the INSTALL document from PYROS/install/
or go on reading this wiki page.
III - INSTALLATION OF NEEDED DEPENDENCIES
Install a database server (only if necessary)
By default, Pyros uses Mysql, but this implies that you have to install the Mysql database server...
Thus, to make things easier, avoid Mysql installation by using Sqlite instead as the database server (which will need no installation at all) :
=> For this, just edit the file PYROS/src/pyros/settings.py and set MYSQL variable to False, and that's it. You can go to next section.
Now, if you really want to use Mysql (which is the default), you will need to install it (only if not already installed), so keep reading.
(Skip this if you are using Sqlite instead of MySql)
- Linux Ubuntu
$ sudo apt-get install mysql-server
$ sudo apt-get install mysql-client
- Linux CentOS
TODO:
$ sudo yum install mysql
...
- Mac OS X
Install XAMPP
(but you could also use the pre-installed Mac OS MySql, or install MySql from macport)TODO:
- Windows (tested with Windows 7)
Download and install the newest version on https://dev.mysql.com/downloads/installer/

Once installed, launch MySQL Installer. Clic on 'Add...' on the right.
In MySQLServers section, choose the newest, then clic on next.
Install and configure the server (just follow the installation guide).

Then launch mysql (via the Windows menu).
Install Python3.5 (only if necessary)
- Mac OS X :
- From binary (Mac OS native application)
(TODO:)
- From MacPort
- a) install macport
(TODO:)
- b) install the "port" python35
$ sudo port install python35
- a) install macport
- From binary (Mac OS native application)
- Linux (Ubuntu) :
$ sudo add-apt-repository ppa:fkrull/deadsnakes
$ sudo apt-get update
$ sudo apt-get install python3.5

$ sudo pip install virtualenv
- Windows (tested with Windows 7) :
(TODO: test with Windows 10)Go to https://www.python.org/downloads/windows/ , choose the wanted version On the wanted version’s page, download Windows x86 executable installer Run the executable * On the first page, check "Add python3.5 to PATH" * Choose "Install now" option Open cmd (windows + R, cmd) : $ python -m pip install --upgrade pip $ pip install virtualenv
Create a Python3 virtual environment dedicated to the project (inside the project folder)
(TODO: make a script)
$ mkdir private/

$ cd private/

$ which python3.5 ("where python" for windows)
/opt/local/bin/python3.5

$ virtualenv venv_py35_pyros -p /opt/local/bin/python3.5
=> creates a venv_py35_pyros/ folder inside PYROS/private/
Activate the python virtual environment (from inside the project)
$ pwd
.../PYROS/private

$ source ./venv_py35_pyros/bin/activate (venv_py35_pyros/Scripts/activate on Windows)

$ python -V
Python 3.5.1

$ which pip
.../PYROS/venv_py35_pyros/bin/pip

Upgrade pip to last version available:
$ pip install --upgrade pip
Collecting pip
  Downloading pip-8.1.1-py2.py3-none-any.whl (1.2MB)
Installing collected packages: pip
  Found existing installation: pip 7.1.2
    Uninstalling pip-7.1.2:
      Successfully uninstalled pip-7.1.2
Successfully installed pip-8.1.1

Upgrade wheel to last version available:
$ pip install --upgrade wheel
Collecting wheel
  Downloading wheel-0.29.0-py2.py3-none-any.whl (66kB)
Installing collected packages: wheel
  Found existing installation: wheel 0.24.0
    Uninstalling wheel-0.24.0:
      Successfully uninstalled wheel-0.24.0
Successfully installed wheel-0.29.0
Install the needed Python packages (from within the virtual environment)
(
TODO: make a script for all these steps, like that :
# check that python is at least version 3.5
python -V
...

# Upgrade pip
pip install --upgrade pip

# Upgrade wheel
pip install --upgrade wheel

# Install the needed python packages
cd .../PYROS/install/
pip install -r REQUIREMENTS.txt
)
First, be sure that the virtual environment is activated:
$ python -V
Python 3.5.1
Go into the install/ folder:
$ cd .../PYROS/install/
Install the needed python packages:
$ pip install -r REQUIREMENTS.txt
If things go wrong, then install the needed packages one by one : see section "MANUAL INSTALLATION OF PYTHON PACKAGES ONE BY ONE")
(Eclipse only) Set the Python3 virtual environment as the project interpreter
clic droit sur projet / Properties / PyDev - Interpreter/Grammar :
Grammar version : 3
Interpreter : click on « click here to configure an interpreter not listed »
click on « New... » :
- Interpreter name : venv_py35_pyros
- Interpreter executable : click on « Browse »
Select your virtualenv python35 executable (private/venv_py35_pyros/bin/python3.5)
click OK
Now, a last thing to do so that Pydev finds Django:
In the Python interpreters list, select your virtual env (venv_py35_pyros)
Click on the tab "Libraries"
clic on 'New folder', then select your virtualenv's lib/python3.5/site-packages folder
OK
Interpreter: select now venv_py35_pyros from the list
OK
Run the project
TODO: more details... (notamment sur localhost:8000/admin)
From the terminal
$ cd src/

$ ./manage.py runserver
(or gunicorn pyros.wsgi)
==> http://localhost:8000
...
...
Ctrl-c
From Eclipse
Right clic on project -> Django/Custom command/runserver
Error on Ubuntu :
Traceback (most recent call last):
  File "/home/carens_p/git/pyros/src/manage.py", line 8, in <module>
    from django.core.management import execute_from_command_line
ImportError: No module named 'django'
Project -> Properties -> Pydev interpreter -> Clic here to configure an interpreter not listed
select venv_py35_pyros
In Libraries, clic on 'New folder', then select your virtualenv's lib/python3.5/site-packages folder.
OK -> re-select venv_py35_pyros in 'Interpreter' dropdown menu
Then right clic on project -> Django/Custom command/runserver
check http://localhost:8000/
IV - TEST
Tests are classes declared in all apps' test.py file. The test classes inherit from django.test.TestCase
You can run the tests suite, just to be sure that the software is well installed.
From Terminal
$ cd src/

$ ./manage.py test

Ran 5 tests in 0.093s

OK
From Eclipse:
- Right-clic on the project / Django / Run Django tests
- Right-clic on the project / Django / Custom command / ...
Custom commands :
$ [./manage.py] test app.tests # Run tests for the application 'app'
$ [./manage.py] test app.tests.ModelTests # Run test methods declared in the class app.tests.ModelTests
$ [./manage.py] test app.tests.ModelTests.test_method # Only run the method test_method declared in app.tests.ModelTests
NOTES FOR ECLIPSE USERS
0) Install Eclipse (if necessary)
Get the Eclipse version for Php
Install the plug-in pydev (via install new software, add http://pydev.org/updates)
Install the django template editor (via install new software, add http://eclipse.kacprzak.org/updates)
1) Deactivate CA certificate verification
Window -> Preferences -> Team -> git -> configuration -> Add entry
Key = http.sslVerify
Value = false
2) Fetch the project
File/Import project from git
Select repository source: Clone URI: https://gitlab.irap.omp.eu/epallier/pyros.git
Directory:
par défaut, il propose : /Users/epallier/git/pyros
mais on peut le mettre ailleurs (c'est ce que j'ai fait)
initial branch: master
remote name: origin
Import as general project
Project name: PYROS
3) Configure the project
The project is created. Now, you have to set it as a «PyDev » and a « Django » project.
clic droit sur le projet / PyDev / set as a PyDev project
clic droit sur le projet / PyDev / set as a Django project
clic droit sur le projet : on doit maintenant avoir un sous-menu Django
clic droit sur le dossier src / PyDev / set as source folder (add to PYTHONPATH)
clic droit sur projet / Properties / Pydev-Django :
- Django manage.py : src/manage.py
- Django settings module : pyros.settings
4) Set Code style
Window/Preferences : Pydev / Editor
- Auto Imports : uncheck « Do auto import »
- Code style:
- Locals … : camelCase
- Methods : camelCase() with first lower
- Code style / Code Formatter: activer « use autopep8.py for code formatting »
- Tabs : Tab length : 4
(
il faudra aussi faire un peu plus loin :
https://projects.irap.omp.eu/projects/pyros/wiki/Project_Installation#Eclipse-only-Set-the-Python3-virtual-environment-as-the-project-interpreter
)